Scheduling a Job
Who is this applicable to?![]() Security Administrator
Security Administrator
A Job in the Customer Portal is a task or set of tasks set forth for the system to execute. A task can be anything from an update to a procedure to set up a feature in the system. These jobs play an important role in updating system-calculated values in many critical modules.
As a Security Administrator of the Customer Portal, you can create jobs for tasks such as notifying users about important updates, or bulk uploading certain data, and so on. To schedule a job in the Customer Portal, perform the following steps:
- From the main menu on the left, navigate to Business Admin > Jobs > Jobs.
- Click
- In the Job tab that opens, under the Job section, enter the Name of the job, followed by Description.
- From the dropdown list, select the Schedule Type.
To know more about the Schedule Types, click here.
The following table gives you a brief description of each Schedule Type:
| Schedule Type | Description |
| Immediate | If you want to run the job immediately. |
| One-time | If you want to run the job for one time. |
| Recurring | If you want to run the job periodically. |

- Depending upon your selection of Schedule Type, select anyone of the following tab:
- To set the GL financial period as close, select the Period Close check box.
- You can set this job as System Job by selecting the System Job checkbox.

- Click the
 to select the Schedule Date.
 - To set the GL financial period as close, select the Period Close check box.
- Choose if you wish the job to Run on Holiday or Skip on Holiday.
- You can set this job as System Job by selecting the System Job checkbox.

- Click to select the Effective Date, i.e., the start date of the job.
- To set the GL financial period as close, select the Period Close check box.
- Choose if you wish the job to Run on Holiday or Skip on Holiday.
- You can set this job as System Job by selecting the System Job checkbox.
- Optionally, by clicking you can set the Expiry Date, that is, an end date for the job.

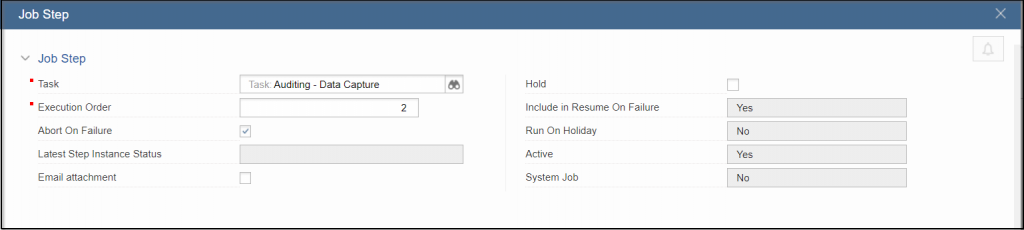
- Under Job Step, click
 to add the job steps. This opens up the Job Step window.
 - Click
 and select the job task from the dropdown list.
 - Enter the Execution Order count. The selected tasks will be executed sequentially based on the count entered here.
- To abort the job on failure, select the Abort on Failure check box.
- If you wish to send an email attachment for the job step, select the Email attachment checkbox.
- To hold the job step, select the Hold checkbox.
- Choose if you wish the job to Run on Holiday or not.
NOTE
The Run on Holiday checkbox for Job Step will be enabled only if the Job is scheduled to Run on Holiday in the Job section.
NOTE
Depending upon the task selected, you might have to set up parameters for the job. Click ![]() to configure job-specific parameters.
to configure job-specific parameters.
- Now you can:
- Click
 to save and exit the Job Step window.
- Click
 to add another job step.
- Click
 to cancel the job step and exit the Job Step window.
- Click
NOTE
In case of errors, you can choose to override the warnings by selecting the Override warnings checkbox at the bottom of the tab, and clicking OK once again.
Incase the Schedule Type selected was Immediate or One time, click here to continue.
Perform the following steps for Scheduler Type as Recurring.
For Frequency type as Occurs Once At click here
- Click
 to set the time to run the job
 - For Every No of Days, enter the number of days after which you want to run the job periodically.
For Frequency type as Every No. of Hours click here.
- Enter the Every No. of Hours and Every No. of Days after which you want to run the job periodically.
- Click to set the From Time and To Time for the job.
- You can choose to run or skip the job between from time and to time by making the appropriate choice.
For Frequency type as Every No. of Minutes click here.
- Enter the Every No. of Minutes and Every No. of Days after which you want to run the job periodically.
- Click to set the From Time and To Time for the job.
- You can choose to run or skip the job between from time and to time by making the appropriate choice.
Select the days on which you want to run the job.
For Frequency type as Occurs Once At click here.
- Set the time to run the job.
- For Every No of Days, enter the number of days after which you want to run the job periodically.
For Frequency type as Every No. of Hours click here.
- Enter the number of hours and number of days after which you want to run the job periodically.
- Click
 to set the start time and end time for the job.
 - You can choose to run or skip the job between from time and to time by making the appropriate choice.
For Frequency type as Every No. of Minutes click here.
- Enter the number of minutes and number of days after which you want to run the job periodically.
- Click to set the start time and end time for the job. Set the start time and end time for the job.
- You can choose to run or skip the job between from time and to time by making the appropriate choice.
From the dropdown list, select the Monthly Type. Follow any one of the following according to your selection.
For Monthly Type as Day of Month click here.
- Set the time to run the job.
- For Every No of Days, enter the number of days after which you want to run the job periodically.
- Enter the number of hours and number of days after which you want to run the job periodically.
- Set the start time and end time for the job.
- You can choose to run or skip the job between from time and to time by selecting the Run or Skip button.
- Enter the number of minutes and number of days after which you want to run the job periodically.
- Set the start time and end time for the job.
- You can choose to run or skip the job between from time and to time by selecting the Run or Skip button.
For Monthly Type as Last Day of Month click here.
Enter the number of months after which you want to run the job periodically.
- Set the time to run the job.
- For Every No of Days, enter the number of days after which you want to run the job periodically.
- Enter the number of hours and number of days after which you want to run the job periodically.
- Set the start time and end time for the job.
- You can choose to run or skip the job between from time and to time by selecting the Run or Skip button.
- Enter the number of minutes and number of days after which you want to run the job periodically.
- Set the start time and end time for the job.
- You can choose to run or skip the job between from time and to time by selecting the Run or Skip button.
For Monthly Type as Day of Week click here.
- Enter the number of months after which you want to run the job periodically.
- From the dropdown list, select the Week Type and followed by Day of the week.
- Set the time to run the job.
- For Every No of Days, enter the number of days after which you want to run the job periodically.
- Enter the number of hours and number of days after which you want to run the job periodically.
- Set the start time and end time for the job.
- You can choose to run or skip the job between from time and to time by selecting the Run or Skip button.
- Enter the number of minutes and number of days after which you want to run the job periodically.
- Set the start time and end time for the job.
- You can choose to run or skip the job between from time and to time by selecting the Run or Skip button.
- In the Notification section, select the Notify checkbox to send the notification for the task.
- Under Job Notifications, you can choose to send notifications for the following operations:
- Job Started
- Job Completed Successfully
- Job Failed
NOTE
The Job notifications will be sent to you only if you select the Notify checkbox in the notification section.
To send notifications for the above-mentioned operations, click here.
- Select the required operation and click
 . This opens the Job Notification Configuration window.
 - To send email notification of the job by selecting the Email Notification checkbox and selecting the Email template from the dropdown list.
- To add recipient configuration details, in the Recipient Configs section, click
 . This opens the Notification Recipient Config window.
 - You can now:
- Send job notification to a single User:
- From the dropdown list, select the User who you want to receive the notification for the job.
- Send job notification to Multiple Users
- Select Multiple Users checkbox.
- Enter the User Selection Expression.
- Send job notification to a single User:
- Optionally, select the User Group from the dropdown list, if any, that should receive the notification, followed by entering the name of the Condition (The condition is expressed as Boolean expression.), From Email and From Email Expression.
- You can choose to override the default email notification content. To do so, select the Override Email Notification Content checkbox and then select the Email Template from the dropdown.
- To notify people who are not the users of the system about the job, the security administrators can enter the sql query in for the email id of such person.
NOTE
Before creating the SQL query, ensure that the email ID of the user is already available in the system.
- Now you can:
- Click to add another user.
- Click
 to save and exit the dialog box.
- Click
- Now you can:
- Add additional user
- Click
 to add another email recipient.
- Click
- Edit user
- Select the required user and click

- Modify the editable fields as required.
- Click to save and exit the dialog box.
- Select the required user and click
- Delete user
- Select the user.
- Click

- Add additional user
- With all the details filled in, click to save and exit the Job Notification Configuration window.
NOTE
In case of errors, you can choose to override the warnings by selecting the Override warnings checkbox at the bottom of the tab, and clicking OK once again.
- Click
 at the bottom of the tab to submit the Job.
NOTE
In case of errors, you can choose to override the warnings by selecting the Override warnings checkbox at the bottom of the tab, and clicking Submit once again.