Requesting Location Change
Who is this applicable to?![]() Portal Administrator, Portal User, Super User
Portal Administrator, Portal User, Super User
NOTE
If you request to change the location of parent assets, then it’s child location will also be requested to change.
You can request to change the location of an asset using the Customer Portal. This action can be performed by any one of these methods:
The quickest way to create an Asset Location Change Request is by using the Quick Actions menu.
From the top-right corner of the screen, click Quick Actions and select the Request Location Change option.
- Navigate to Asset > Request Location Change. This opens Asset Location Change Requests tab.
- Click
 to create a location change request.
You can choose to create an Asset Location Change Request for a specific asset from the Asset Details page.
From the main menu header, navigate to Assets > Assets. This opens Assets tab.
Click ![]() corresponding to the Asset # for which you wish to create the request, and click
corresponding to the Asset # for which you wish to create the request, and click ![]()
Users can choose to pay multiple invoices at once. To pay more than one invoices,
- Select the required assets and then scroll down to click
 . This opens a Change Location window on right.
You can choose to create an Asset Location Change Request for a specific asset associated to a contract from the corresponding Contract Details page.
- From the main menu header, navigate to Contracts > Contracts.
- Click
 corresponding to the Contract # for which you wish to create the request, and click
  . This displays the list of assets associated to that contract.
 - Click corresponding to the Asset # for which you wish to create the request, and click Change Location.
Once you have reached the request creation page via any of the above methods, perform the following steps:
- In the Assets section, click

- From the Import Assets window, select the required assets. You can use the Select all option available in the top right corner to select all the available assets.
- Once you have selected the required assets, click
 on the bottom right.
 - From here, you can either:
- Select an Existing Location from the drop-down list.
- Or Enter New Location Details such as name, and other address details.
- Click
 to select the Effective Date of the location change.
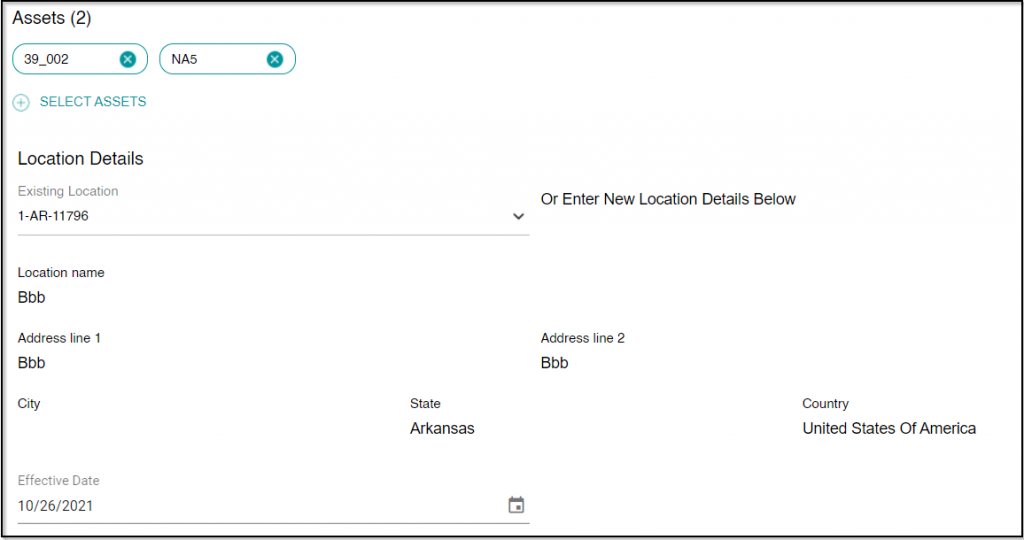
- With all the details filled in, click
On successful completion, you will receive a confirmation as follows:
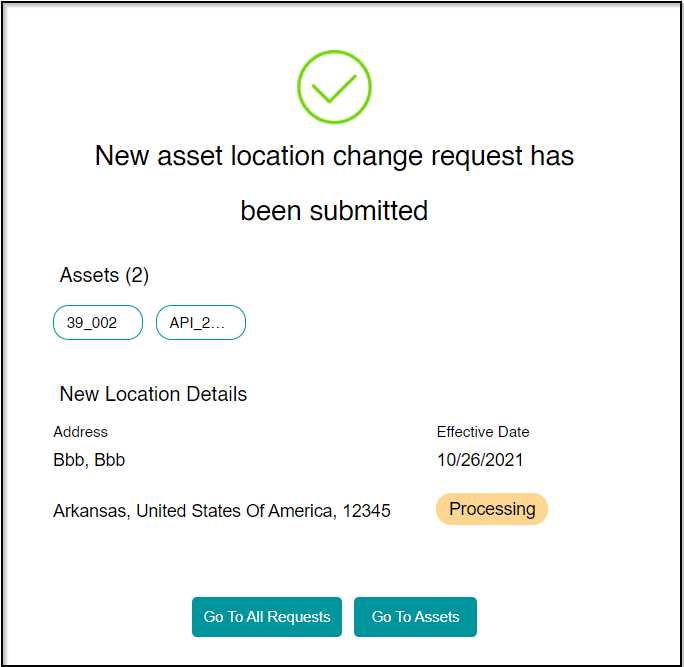
From here, you can choose to go to all requests by clicking ![]() or go to assets by clicking
or go to assets by clicking ![]()